How to create a sill
Having deployed our extension to WindowSill and observed its functionality, let us now examine the underlying mechanisms and explore how to customize it according to your requirements.
Fundamentals
There are two fundamental questions to address when creating a sill:
- What should the sill look like?
- Under what conditions should the sill be visible?
For each of these questions, multiple options are available:
Sill appearance
There are 2 categories of sill appearance, some of which contain sub-categories.
- A list of items or commands.
- A custom view.
Command list
Utilize ISillListView for this purpose. Examples of use cases include:
An AI assistant

A list of tasks or reminders
A clipboard history
The list can contain three types of items:
- SillListViewButtonItem - A simple button that triggers an action upon being clicked. Use this when an action can be executed immediately upon a click.
- SillListViewPopupItem - A popup button, which displays a popup when clicked. Use this when a command requires multiple interactions, such as entering parameters or selecting from multiple sub-options.
- SillListViewMenuFlyoutItem - A flyout menu button, which displays a menu flyout when clicked. Use this when you need to provide a list of sub-actions presented as commands, without additional input such as text entry.
In the simple extension we created earlier, we implemented ISillListView and displayed a SillListViewButtonItem with a + icon in it.
Note
You can mix buttons, popup butons and flyout menu buttons within the same ISillListView, along with dynamically changing at runtime.
Custom view
Utilize ISillSingleView for this purpose. Examples of use cases include:
- Media controls
- A color picker
- A volume mixer
- Any interface where user interaction is not expected but information needs to be displayed to the user.
Sill activation
There are 4 ways to trigger a sill to be activated and visible:
- ISillActivatedByDragAndDrop - Activated when drag-and-dropping files or other data in WindowSill, or when selecting files or folders in File Explorer.
- ISillActivatedByProcess - Activated when an app running on Windows gets the focus.
- ISillActivatedByTextSelection - Activated when a text is selected in any app on Windows.
- ISillActivatedByDefault - Always activated and manually handled.
At least one of these interface should be implemented along with one of the sill appearance interface mentioned above. For example:
[Export(typeof(ISill))]
[Name("Sill A")]
public sealed class SillA : ISillActivatedByProcess, ISillListView
{
}

[Export(typeof(ISill))]
[Name("Sill b")]
public sealed class SillB : ISillActivatedByTextSelection, ISillSingleView
{
}
For activation by drag-and-drop, process and text selection, the internal name of an ISillActivator should be indicated to indicate which detector / activator should activate your sill.
Note
Any ISill implementation may be instantiated multiple times for various reason. Keep consideration of this aspect when designing extension that loads a lot of resources when being instantiated. It is recommended to cache data.
Activators
While an exported ISIll defines a bar that should be displayed in WindowSill and to what event it reacts to be activated, it does not implement the activation condition. For this, we need to create a sill activator.
There are three types of activator you can create:
- ISillDragAndDropActivator - To detect a data being drag-and-dropped into WindowSill, such as an image, or a specific file type.
- ISillProcessActivator - To detect that a specific process has the focus, such as Notepad.
- ISillTextSelectionActivator - To detect a specific text is selected in any app, such as JSON, YAML, text in English, Spanish, or a text that contains typos.
In the simple extension we created earlier, we implemented an ISillProcessActivator and referred it in our ISillListView.
The example below declares a sill activator that detects whether the foreground window corresponds to Notepad.
[Export(typeof(ISillProcessActivator))]
[ActivationType(InternalName)]
internal sealed class NotepadProcessActivator : ISillProcessActivator
{
    internal const string InternalName = "Notepad Activator";

    public ValueTask<bool> GetShouldBeActivatedAsync(string applicationIdentifier, Process process, Version? version, CancellationToken cancellationToken)
    {
        // Detects if the focused application is Notepad.
        return ValueTask.FromResult(applicationIdentifier.EndsWith("Notepad.exe"));
    }
}
User Interface
Extensions for WindowSill are essentially Dynamic-Link Libraries (.dll) loaded at runtime.
You can create a custom UI for an extension by using XAML (for WindowSill 0.5.0.0 and later!), or Uno Platform's C# for Markup (for WindowSill 0.0.1.0 and later).
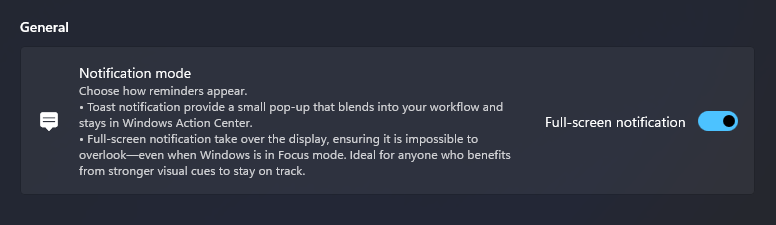
The following C# for Markup code gives the UI presented in the screenshot below:
internal sealed class SettingsView : UserControl
{
    public SettingsView(ISettingsProvider settingsProvider)
    {
        this.DataContext(
            new SettingsViewModel(settingsProvider),
            (view, viewModel) => view
            .Content(
                new StackPanel()
                    .Spacing(2)
                    .Children(
                        new TextBlock()
                            .Style(x => x.ThemeResource("BodyStrongTextBlockStyle"))
                            .Margin(0, 0, 0, 8)
                            .Text("/WindowSill.ShortTermReminder/Settings/General".GetLocalizedString()),

                        new SettingsCard()
                            .Header("/WindowSill.ShortTermReminder/Settings/NotificationMode/Header".GetLocalizedString())
                            .Description("/WindowSill.ShortTermReminder/Settings/NotificationMode/Description".GetLocalizedString())
                            .HeaderIcon(
                                new FontIcon()
                                    .Glyph("\uE7E7")
                            )
                            .Content(
                                new ToggleSwitch()
                                    .OnContent("/WindowSill.ShortTermReminder/Settings/NotificationModeToggle/OnContent".GetLocalizedString())
                                    .OffContent("/WindowSill.ShortTermReminder/Settings/NotificationModeToggle/OffContent".GetLocalizedString())
                                    .IsOn(
                                        x => x.Binding(() => viewModel.UseFullScreenNotification)
                                              .TwoWay()
                                              .UpdateSourceTrigger(UpdateSourceTrigger.PropertyChanged)
                                    )
                            )
                    )
            )
        );
    }
}
Multiple Display Support
By default, your sill support a single display. This mean that if a user has WindowSill displayed on multiple monitors, your sill will be displayed on only one monitor.
When implementing ISillDragAndDropActivator, ISillProcessActivator or ISillTextSelectionActivator, your sill will be instantiated once per monitors. Your sill then gets activated on the monitor on which the user has the focus. For example, if there's two monitors, A and B, and that the user selected a text on monitor B, then a sill implementing ISillTextSelectionActivator may only be activated on monitor B.
When implementing ISillActivatedByDefault, by default, the sill is only activated on the primary monitor. To allow your sill to be displayed on multiple monitors at once, use the SupportMultipleMonitorsAttribute. Example:
[Export(typeof(ISill))]
[Name("Sill A")]
[SupportMultipleMonitors(showOnEveryMonitorsByDefault: true)]
public sealed class SillA : ISillActivatedByProcess, ISillListView
{
}
Note
Any ISill implementation may be instantiated multiple times for various reason, but it will only be activated multiple times if the sill supports multiple monitors. Keep consideration of this aspect when designing extension that loads a lot of resources when being instantiated. It is recommended to cache data.
Note
Ensure the UI of your sill has a unique instance per instance of ISill. In other word, it is not recommended to cache the user interface and reuse this cache across ISill instances, as the UI may be injected at multiple places in the WindowSill, which can cause your extension to crash.